설치하기 전 oracle 설치파일 다운
다음 링크로 접속하여 Oracle 설치파일을 다운로드 할 것이다.
https://www.oracle.com/database/technologies/oracle-database-software-downloads.html
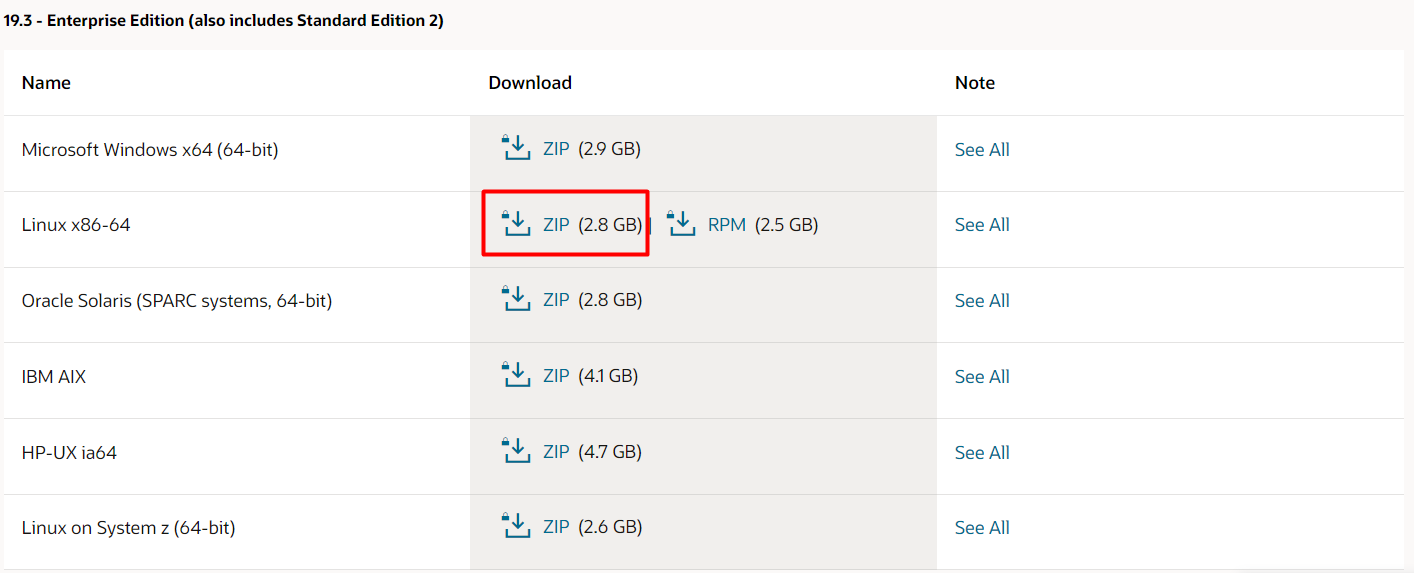
여기에서 리눅스 기반 파일을 다운받을 것이다.
다운 받은 후 리눅스에 파일을 업로드한다.
CentOS 7에 Oracle 19c 설치
Hosts file 변경

[root@ol7-19 ~]# cat /etc/hosts
127.0.0.1   localhost localhost.localdomain localhost4 localhost4.localdomain4
10.0.3.15       test            test
hostname 변경

[root@oracle ~]# vi /etc/hostname
[root@oracle ~]# cat /etc/hostname
test
/etc/hostname에서 hostname을 변경한다.
reboot 후에 hostname이 변경된 것을 확인할 수 있다.
Oracle 설치 전제 조건
/etc/sysctl.conf 파일에 다음과 같이 수정한다.
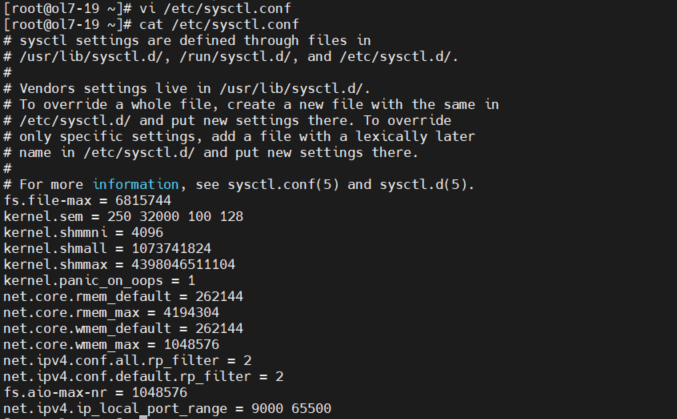
[root@ol7-19 ~]# vi /etc/sysctl.conf
[root@ol7-19 ~]# cat /etc/sysctl.conf
# sysctl settings are defined through files in
# /usr/lib/sysctl.d/, /run/sysctl.d/, and /etc/sysctl.d/.
#
# Vendors settings live in /usr/lib/sysctl.d/.
# To override a whole file, create a new file with the same in
# /etc/sysctl.d/ and put new settings there. To override
# only specific settings, add a file with a lexically later
# name in /etc/sysctl.d/ and put new settings there.
#
# For more information, see sysctl.conf(5) and sysctl.d(5).
fs.file-max = 6815744
kernel.sem = 250 32000 100 128
kernel.shmmni = 4096
kernel.shmall = 1073741824
kernel.shmmax = 4398046511104
kernel.panic_on_oops = 1
net.core.rmem_default = 262144
net.core.rmem_max = 4194304
net.core.wmem_default = 262144
net.core.wmem_max = 1048576
net.ipv4.conf.all.rp_filter = 2
net.ipv4.conf.default.rp_filter = 2
fs.aio-max-nr = 1048576
net.ipv4.ip_local_port_range = 9000 65500- fs.file-max : 시스템 전체에서 최대로 열 수 있는 파일 개수
- kernel.sem : 대응하는 4개의 값 - SEMMSL, SEMMNS, SEMOPM, SEMMNI
- SEMMSL : 설정별로 허용된 최대 세마포어 양
- SEMMNS : 최대 세마포어 수
- SEMOPM : 단일 조작에서의 최대 조작 수
- SEMMNI : 최대 세마포어 세트 수
- kernel.shmmni : 최대 세마포어 세트 수, 공유메모리 식별자의 개수
- kernel.shmall : 최대 공유 메모리 크기 설정 (페이지)
- kernel.shmmax : 공유 메모리 세그먼트의 최대 크기 설정 (바이트)
- kernel.panic_on_oops : opps 또는 BUG 조건이 발생하면 패닉 (1인 경우, 0인경우 반대)
- net.core.rmem_default, net.core.rmem_max : 오라클은 기본적으로 대용량 데이터베이스를 기준으로 하기 때문에 기본 설정된 값을 변경
- net.core.wmem_default, net.core.wmem_max : 소켓 출력 큐의 기본 값과 최대 값을 조정하기 위한 매개변수
- net.ipv4.conf.all.rp_filter, net.ipv4.conf.default.rp_filter : 자신의 네트워크가 아이피 스푸핑 공격에 방지하기 위해 설정
- fs.aio-max-nr : 허가된 최대 동시 요청 수
- net.ipv4.ip_local_port_range : 새 접속에서 사용할 수 있는 포트의 사용 가능 범위를 확장
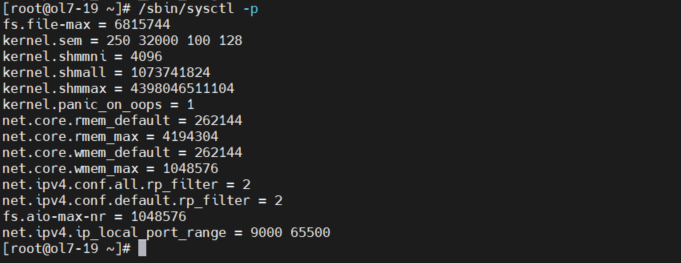
현재 커널 매개변수를 변경
/sbin/sysctl -p
"/etc/security/limits.conf" 파일에 아래와 같이 추가한다.
[root@ol7-19 ~]# vi /etc/security/limits.conf
oracle soft nofile 1024
oracle hard nofile 65536
oracle soft nproc 16384
oracle hard nproc 16384
oracle soft stack 10240
oracle hard stack 32768
oracle hard memlock 134217728
oracle soft memlock 134217728- soft : 오라클 프로그램 처음 수행시
- hard : 오라클 프로그램 수행시
- nofile : User당 오픈할 수 있는 파일 개수
- nproc : User당 사용할 수 있는 프로세스 최대 개수
- stack : 최대 stack 사이즈 (KB)
- memlock : 최대 locked-in-memory 주소 공간 (KB)
패키지 설치
인터넷이 안되므로 yum을 이용해 패키지를 설치하는 것이 아닌 rpm으로 설치할 것이다.
설치 패키지를 확인하고 없는 패키지를 따로 설치한다.
rpm -qa | grep bc
rpm -qa | grep binutils
rpm -qa | grep compat-libcap1
rpm -qa | grep compat-libstdc++-33
rpm -qa | grep dtrace-modules
rpm -qa | grep dtrace-modules-headers
rpm -qa | grep dtrace-modules-provider-headers
rpm -qa | grep dtrace-utils
rpm -qa | grep elfutils-libelf
rpm -qa | grep elfutils-libelf-devel
rpm -qa | grep fontconfig-devel
rpm -qa | grep glibc
rpm -qa | grep glibc-devel
rpm -qa | grep ksh
rpm -qa | grep libaio
rpm -qa | grep libaio-devel
rpm -qa | grep libdtrace-ctf-devel
rpm -qa | grep libXrender
rpm -qa | grep libXrender-devel
rpm -qa | grep libX11
rpm -qa | grep libXau
rpm -qa | grep libXi
rpm -qa | grep libXtst
rpm -qa | grep libgcc
rpm -qa | grep librdmacm-devel
rpm -qa | grep libstdc++
rpm -qa | grep libstdc++-devel
rpm -qa | grep libxcb
rpm -qa | grep make
rpm -qa | grep net-tools # Clusterware
rpm -qa | grep nfs-utils # ACFS
rpm -qa | grep python # ACFS
rpm -qa | grep python-configshell # ACFS
rpm -qa | grep python-rtslib # ACFS
rpm -qa | grep python-six # ACFS
rpm -qa | grep targetcli # ACFS
rpm -qa | grep smartmontools
rpm -qa | grep sysstat
여기서 필요한 패키지를 확인하고 설치한다.
[root@localhost ~]# cd /run/media/root/CentOS\ 7\ x86_64/Packages/
설치는 다음과 같이 rpm -Uvh 로 설치한다.
[root@localhost Packages]# rpm -Uvh glibc-devel-2.17-317.el7.x86_64.rpm
그룹 및 사용자 생성
[root@ol7-19 ~]# groupadd -g 54321 oinstall
[root@ol7-19 ~]# groupadd -g 54322 dba
[root@ol7-19 ~]# groupadd -g 54323 oper

[root@ol7-19 ~]# useradd -u 54321 -g oinstall -G dba,oper oracle- oinstall : Oracle 인벤토리 그룹, 시스템에 설치된 모든 Oracle 소프트웨어의 카탈로그인 Oracle 인벤토리를 소유
- dba : 데이터베이스 관리 그룹, 일반적으로 root 사용자와 oracle 사용자를 포함, 데이터베이스 관리 권한이 있는 운영체제 사용자 계정 식별
- oper : 제한된 데이터베이스 관리 권한 그룹
- useradd -u 54321 -g oinstall -G dba,oper oracle : 계정 생성시 oracle 계정의 기본 그룹은 oinstall이고, 추가 소속 그룹은 dba 와 oper 이다.
oracle 유저의 비밀번호 변경
[root@ol7-19 ~]# passwd oracle
oracle 사용자의 비밀 번호 변경 중
새  암호: oracle
잘못된 암호: 암호는 8 개의 문자 보다 짧습니다
새  암호 재입력:
passwd: 모든 인증 토큰이 성공적으로 업데이트 되었습니다.
그룹 확인
[root@ol7-19 ~]# cat /etc/group
...
oinstall:x:54321:
dba:x:54322:oracle
oper:x:54323:oracle
SELINUX 설정
SELINUX=permissive 로 변경
SELINUX 변경이 완료되면 서버를 재시작한다.
[root@ol7-19 ~]# vi /etc/selinux/config
[root@ol7-19 ~]# cat /etc/selinux/config

# This file controls the state of SELinux on the system.
# SELINUX= can take one of these three values:
#     enforcing - SELinux security policy is enforced.
#     permissive - SELinux prints warnings instead of enforcing.
#     disabled - No SELinux policy is loaded.
SELINUX=permissive
# SELINUXTYPE= can take one of three values:
#     targeted - Targeted processes are protected,
#     minimum - Modification of targeted policy. Only selected processes are protected.
#     mls - Multi Level Security protection.
SELINUXTYPE=targeted
방화벽 설정
[root@ol7-19 ~]# systemctl stop firewalld
[root@ol7-19 ~]# systemctl disable firewalld
Oracle 소프트웨어 설치 디렉토리 생성
[root@ol7-19 ~]# mkdir -p /u01/app/oracle/product/19.0.0/dbhome_1
[root@ol7-19 ~]# mkdir -p /u02/oradata
[root@ol7-19 ~]# chown -R oracle:oinstall /u01 /u02
[root@ol7-19 ~]# chmod -R 775 /u01 /u02
오라클 설치용 패키지를 설치 디렉토리로 이동
[root@ol7-19 ~]# cd /u01/app/oracle/product/19.0.0/dbhome_1
[root@ol7-19 dbhome_1]# cp /home/dy/LINUX.X64_193000_db_home.zip ./
[root@ol7-19 dbhome_1]# ls -alrt
합계 2987996
drwxrwxr-x. 3 oracle oinstall         22  4월 25 10:34 ..
drwxrwxr-x. 2 oracle oinstall         42  4월 25 10:36 .
-rw-r--r--. 1 root   root     3059705302  4월 25 10:37 LINUX.X64_193000_db_home.zip
[root@ol7-19 dbhome_1]#
스크립트 디렉토리 생성
[root@ol7-19 ~]# mkdir /home/oracle/scripts
setEnv.sh 환경 파일 생성
ORACLE_BASE=/u01/app/oracle
ORACLE_HOME=\$ORACLE_BASE/product/19.0.0/dbhome_1
- ORACLE_HOSTNAME : 오라클 컴퓨터 이름
- ORACLE_UNQNAME : 데이터베이스 의 고유한 이름 값을 보유하는 운영 체제 환경 변수
- ORACLE_BASE : 사용할 오라클 데이터베이스의 ORACLE_BASE 디렉토리, 오라클에 관한 여러가지 파일을 배치하는 거점이 될 디렉토리
- ORACLE_HOME : 사용할 데이터베이스의 ORACLE_HOME 디렉토리, 오라클 소프트웨어를 설치할 디렉토리
- ORA_INVENTORY : 설치한 도구들에 관한 정보나 ORACLE_HOME에 관한 정보가 존재하는 일종의 레파지토리
- ORACLE_SID : 사용할 데이터베이스의 SID, 인스턴스 식별자
- DATA_DIR : 데이터 디렉토리
- PATH : 명령어 탐색하는 경로 정보
[root@test ~]# cat /home/oracle/.bash_profile# .bash_profile
# Get the aliases and functions
if [ -f ~/.bashrc ]; then
. ~/.bashrc
fi
# User specific environment and startup programs
PATH=$PATH:$HOME/.local/bin:$HOME/bin
export PATH
#. /home/oracle/scripts/setEnv.sh
export TMP=/tmp
export TMPDIR=$TMP
#export ORACLE_HOSTNAME=ol7-19.localdomain
export ORACLE_UNQNAME=orcl
export ORACLE_BASE=/u01/app/oracle
export ORACLE_HOME=$ORACLE_BASE/product/19.0.0/dbhome_1
#export ORA_INVENTORY=/u01/app/oraInventory
export ORACLE_SID=orcl
export DATA_DIR=/u02/oradata
export PATH=/usr/sbin:/usr/local/bin:$PATH
export PATH=$ORACLE_HOME/bin:$PATH
export LD_LIBRARY_PATH=$ORACLE_HOME/lib:/lib:/usr/lib
export CLASSPATH=$ORACLE_HOME/jlib:/$ORACLE_HOME/rdbms/jlib
+ 원래 하던 방법 (오류 문제로 수정, 위 방법으로 환경 파일 생성)
[root@ol7-19 ~]# vi /home/oracle/scripts/setEnv.sh
[root@ol7-19 ~]# cat /home/oracle/scripts/setEnv.sh
# Oracle Settings
export TMP=/tmp
export TMPDIR=\$TMP

export ORACLE_HOSTNAME=ol7-19.localdomain
export ORACLE_UNQNAME=cdb1
export ORACLE_BASE=/u01/app/oracle
export ORACLE_HOME=\$ORACLE_BASE/product/19.0.0/dbhome_1
export ORA_INVENTORY=/u01/app/oraInventory
export ORACLE_SID=cdb1
export PDB_NAME=pdb1
export DATA_DIR=/u02/oradata

export PATH=/usr/sbin:/usr/local/bin:\$PATH
export PATH=\$ORACLE_HOME/bin:\$PATH

export LD_LIBRARY_PATH=\$ORACLE_HOME/lib:/lib:/usr/lib
export CLASSPATH=\$ORACLE_HOME/jlib:\$ORACLE_HOME/rdbms/jlib
"/home/oracle/.bash_profile" 파일 끝에 "setEnv.sh" 파일에 대한 참조를 추가한다.
[root@ol7-19 ~]# echo ". /home/oracle/scripts/setEnv.sh" >> /home/oracle/.bash_profile
[root@ol7-19 ~]# cat /home/oracle/.bash_profile
# .bash_profile

# Get the aliases and functions
if [ -f ~/.bashrc ]; then
        . ~/.bashrc
fi

# User specific environment and startup programs

PATH=$PATH:$HOME/.local/bin:$HOME/bin

export PATH
. /home/oracle/scripts/setEnv.sh
시작/종료를 호출할 수 있는 파일 생성
편의를 위해 생성하므로 start_all.sh 만 생성해도 된다.
[root@ol7-19 ~]# vi /home/oracle/scripts/start_all.sh
[root@ol7-19 ~]# cat /home/oracle/scripts/start_all.sh
#!/bin/bash
. /home/oracle/scripts/setEnv.sh

export ORAENV_ASK=NO
. oraenv
export ORAENV_ASK=YES

dbstart \$ORACLE_HOME
[root@ol7-19 ~]# vi /home/oracle/scripts/stop_all.sh
[root@ol7-19 ~]# cat /home/oracle/scripts/stop_all.sh
#!/bin/bash
. /home/oracle/scripts/setEnv.sh

export ORAENV_ASK=NO
. oraenv
export ORAENV_ASK=YES

dbshut \$ORACLE_HOME
오라클 설치 완료 후 "/etc/oratab"을 편집했으면 "oracle" 사용자가 실행하는 다음 스크립트를 사용하여 데이터베이스를 시작/중지 가능하다.
~/scripts/start_all.sh
~/scripts/stop_all.sh
디렉토리 소유권 및 파일 권한을 설정
*수정 전
[root@ol7-19 ~]# ls -alrt /home/oracle/scripts
합계 12
drwx------. 4 oracle oinstall 107  4월 25 10:45 ..
-rw-r--r--. 1 root   root     531  4월 25 15:04 setEnv.sh
-rw-r--r--. 1 root   root     121  4월 25 15:31 start_all.sh
-rw-r--r--. 1 root   root     120  4월 25 15:32 stop_all.sh
drwxr-xr-x. 2 root   root      62  4월 25 15:32 .
[root@ol7-19 ~]# ls -alrt /home/oracle/scripts/*.sh
-rw-r--r--. 1 root root 531  4월 25 15:04 /home/oracle/scripts/setEnv.sh
-rw-r--r--. 1 root root 121  4월 25 15:31 /home/oracle/scripts/start_all.sh
-rw-r--r--. 1 root root 120  4월 25 15:32 /home/oracle/scripts/stop_all.sh


[root@ol7-19 ~]# chown -R oracle:oinstall /home/oracle/scripts
[root@ol7-19 ~]# chmod u+x /home/oracle/scripts/*.sh

*수정 후
[root@ol7-19 ~]# ls -alrt /home/oracle/scripts
합계 12
drwx------. 4 oracle oinstall 107  4월 25 10:45 ..
-rwxr--r--. 1 oracle oinstall 531  4월 25 15:04 setEnv.sh
-rwxr--r--. 1 oracle oinstall 121  4월 25 15:31 start_all.sh
-rwxr--r--. 1 oracle oinstall 120  4월 25 15:32 stop_all.sh
drwxr-xr-x. 2 oracle oinstall  62  4월 25 15:32 .
[root@ol7-19 ~]# ls -alrt /home/oracle/scripts/*.sh
-rwxr--r--. 1 oracle oinstall 531  4월 25 15:04 /home/oracle/scripts/setEnv.sh
-rwxr--r--. 1 oracle oinstall 121  4월 25 15:31 /home/oracle/scripts/start_all.sh
-rwxr--r--. 1 oracle oinstall 120  4월 25 15:32 /home/oracle/scripts/stop_all.sh
INSTALL
root 계정에서 xhost + 실행
[root@ol7-19 dbhome_1]$ xhost +
access control disabled, clients can connect from any host
※ 오라클 사용자로 로그인 및 XWindow에서 실행한다.
X 에뮬레이션을 사용하는 경우 DISPLAY 환경 변수를 설정
[oracle@ol7-19 dbhome_1]$ export DISPLAY=:0.0
설치 소프트웨어 압축 해제
ORACLE_HOME이 경로에 직접 소프트웨어 압축을 푼다.
디렉토리에서 다음 명령 중 하나를 실행하여 OUI(Oracle Universal Installer)를 시작
대화형 모드는 사용자 입력을 허용하는 GUI 설치 프로그램 화면을 표시한다.
ORACLE_BASE=/u01/app/oracle
ORACLE_HOME=\$ORACLE_BASE/product/19.0.0/dbhome_1
# 소프트웨어의 압축을 풉니다.
cd $ORACLE_HOME
unzip -oq /path/to/software/LINUX.X64_193000_db_home.zip

# 대화형 모드.
./runInstaller
unzip -oq
-o : 메시지를 표시하지 않고 파일을 덮어씀
-q : 조용한 모드
[oracle@ol7-19 ~]$ cd /u01/app/oracle/product/19.0.0/dbhome_1
[oracle@ol7-19 dbhome_1]$ ls -alrt
합계 2987996
drwxrwxr-x. 3 oracle oinstall         22  4월 25 10:34 ..
drwxrwxr-x. 2 oracle oinstall         42  4월 25 10:36 .
-rw-r--r--. 1 root   root     3059705302  4월 25 10:37 LINUX.X64_193000_db_home.zip
[oracle@ol7-19 dbhome_1]$ unzip -oq LINUX.X64_193000_db_home.zip
runInstaller 실행
DISPLAY 실행 후 runInstaller 실행시 오류 발생
[oracle@ol7-19 dbhome_1]$ export DISPLAY=:0.0
[oracle@ol7-19 dbhome_1]$ ./runInstaller
ERROR: Unable to verify the graphical display setup. This application requires X display. Make sure that xdpyinfo exist under PATH variable.

Can't connect to X11 window server using 'ol7-19.localdomain:0.0' as the value of the DISPLAY variable.
→ 오류 해결
환경 변수 설정 오류
다음과 같이 환경 변수 수정
[root@test ~]# cat /home/oracle/.bash_profile# .bash_profile
# Get the aliases and functions
if [ -f ~/.bashrc ]; then
. ~/.bashrc
fi
# User specific environment and startup programs
PATH=$PATH:$HOME/.local/bin:$HOME/bin
export PATH
#. /home/oracle/scripts/setEnv.sh
export TMP=/tmp
export TMPDIR=$TMP
#export ORACLE_HOSTNAME=ol7-19.localdomain
export ORACLE_UNQNAME=orcl
export ORACLE_BASE=/u01/app/oracle
export ORACLE_HOME=$ORACLE_BASE/product/19.0.0/dbhome_1
#export ORA_INVENTORY=/u01/app/oraInventory
export ORACLE_SID=orcl
export DATA_DIR=/u02/oradata
export PATH=/usr/sbin:/usr/local/bin:$PATH
export PATH=$ORACLE_HOME/bin:$PATH
export LD_LIBRARY_PATH=$ORACLE_HOME/lib:/lib:/usr/lib
export CLASSPATH=$ORACLE_HOME/jlib:/$ORACLE_HOME/rdbms/jlib
Hostname 및 hosts 설정 문제
현재 CentOS7 리눅스 설정을 네트워크를 2개 잡아줘서 인식 오류가 있었다.
현재 IP가 2개 잡혀있다.
[root@ol7-19 ~]# ifconfig -a
enp0s3: flags=4163<UP,BROADCAST,RUNNING,MULTICAST>  mtu 1500
        inet 192.168.56.11  netmask 255.255.255.0  broadcast 192.168.56.255
        inet6 fe80::a00:27ff:fe5e:42ee  prefixlen 64  scopeid 0x20<link>
        ether 08:00:27:5e:42:ee  txqueuelen 1000  (Ethernet)
        RX packets 810  bytes 69537 (67.9 KiB)
        RX errors 0  dropped 0  overruns 0  frame 0
        TX packets 1096  bytes 205686 (200.8 KiB)
        TX errors 0  dropped 0 overruns 0  carrier 0  collisions 0

enp0s8: flags=4163<UP,BROADCAST,RUNNING,MULTICAST>  mtu 1500
        inet 10.0.3.15  netmask 255.255.255.0  broadcast 10.0.3.255
        inet6 fe80::26d8:9b10:bbbd:d416  prefixlen 64  scopeid 0x20<link>
        ether 08:00:27:65:7d:31  txqueuelen 1000  (Ethernet)
        RX packets 2  bytes 1180 (1.1 KiB)
        RX errors 0  dropped 0  overruns 0  frame 0
        TX packets 64  bytes 9508 (9.2 KiB)
        TX errors 0  dropped 0 overruns 0  carrier 0  collisions 0
...
또한, 현재 hostname 이 ol7-19.localdomain 로 잡혀있었는데 .이나 특수문자가 들어가서 오류가 있을 수 있어 hostname을 test로 변경해준다.
Hosts file을 변경해준다. (NAT로 설정된 IP와 hostname 설정)
[root@ol7-19 ~]# cat /etc/hosts
127.0.0.1   localhost localhost.localdomain localhost4 localhost4.localdomain4
10.0.3.15       test            test
다시 runInstaller 실행
root 계정에서 xhost + 실행
[root@ol7-19 dbhome_1]$ xhost +
access control disabled, clients can connect from any host
oracle 계정으로 로그인 후 ./runInstaller 실행
[oracle@ol7-19 dbhome_1]$ export DISPLAY=:0.0
[oracle@ol7-19 dbhome_1]$ ./runInstaller
오라클 설치
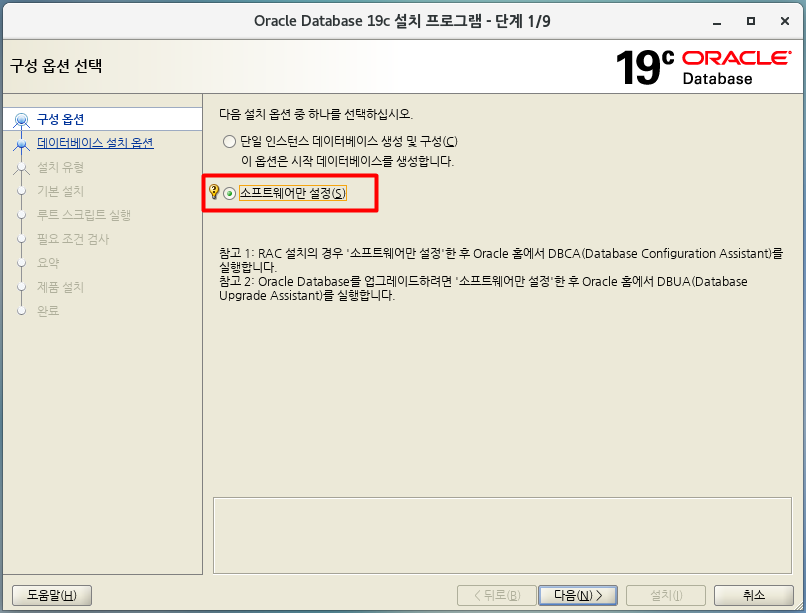
오라클 소프트웨어만 설정 선택
소프트웨어만 설정할 경우 설치시 옵션을 선택해야 하는 경우가 많기 때문에 소프트웨어만 설치로 진행한다.
단일 인스턴스 데이터베이스 설치 선택
오라클 싱글로 설치할 것이기 때문에 단일 인스턴스 데이터베이스만 설치한다.

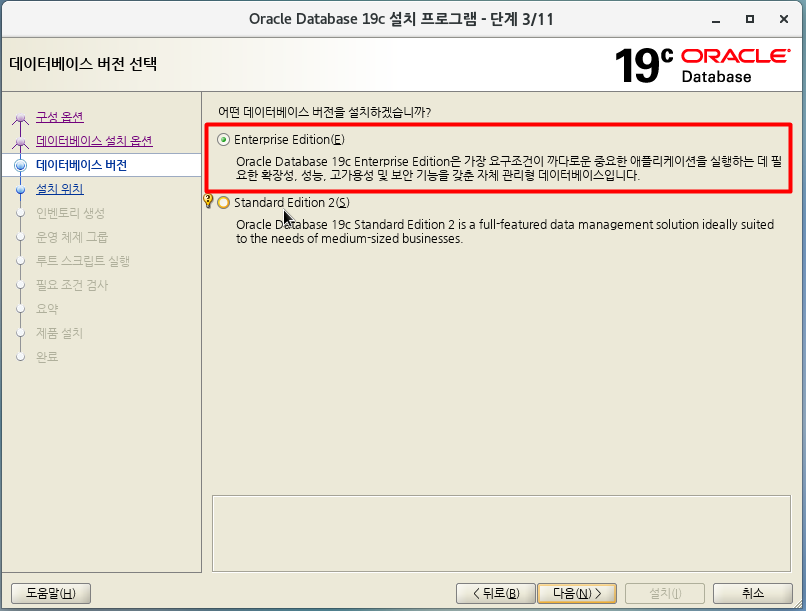
Enterprise Edition 선택
ORACLE_BASE 설정
/home/oracle/.bash_profile 파일에서 ORACLE_BASE와 ORACLE_HOME을 확인하고 다음을 누른다.

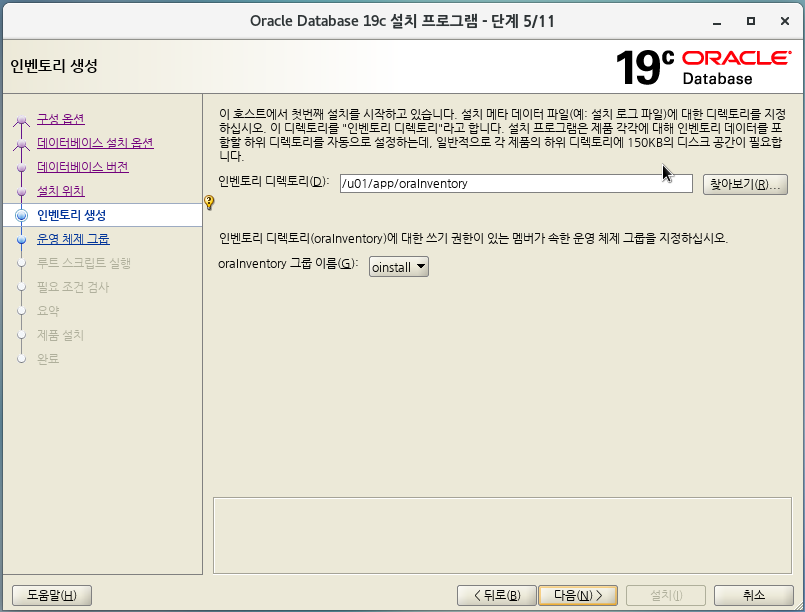
인벤토리 경로 선택
인벤토리 디렉토리와 orainventory 그룹을 설정하고 다음을 누른다.
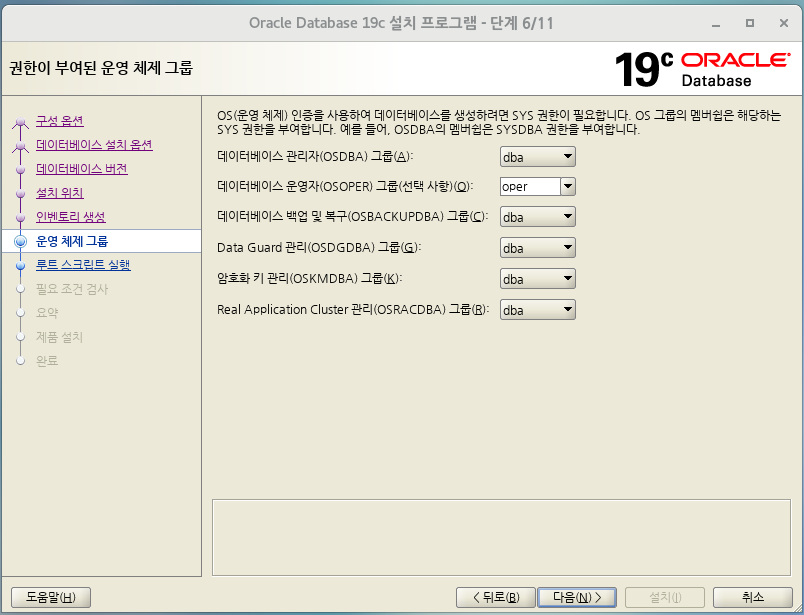
그룹 권한 설정
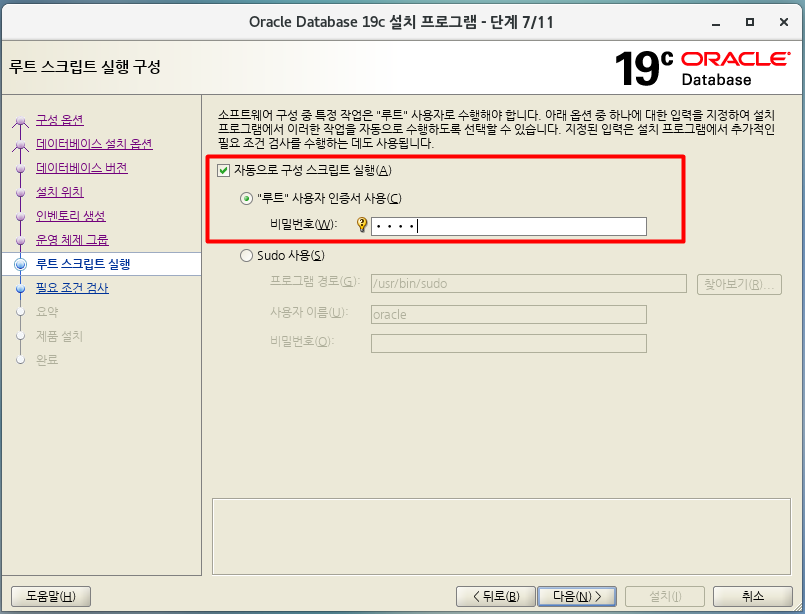
자동으로 root 실행을 위한 root 패스워드 입력
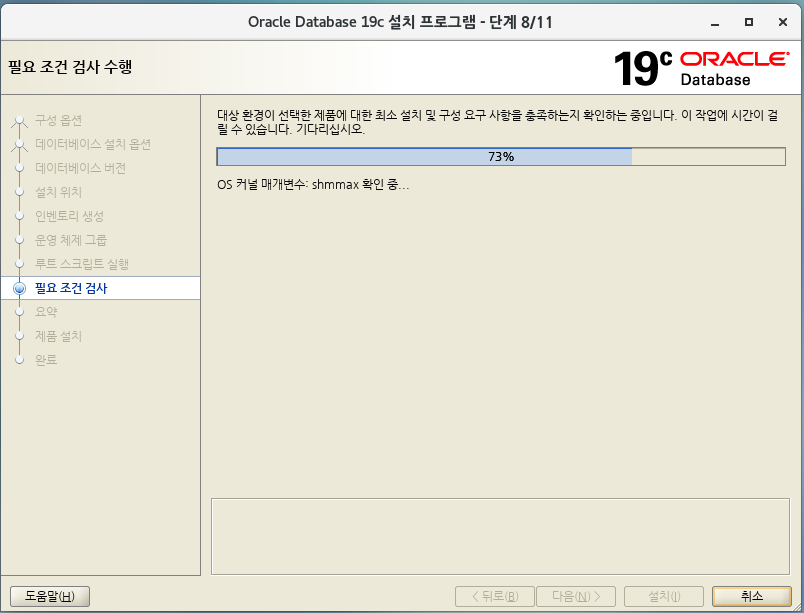
사전 요구사항 체크
현재 gcc 패키지가 설치 되지 않았으므로 gcc-c++4.8.2를 설치한다.
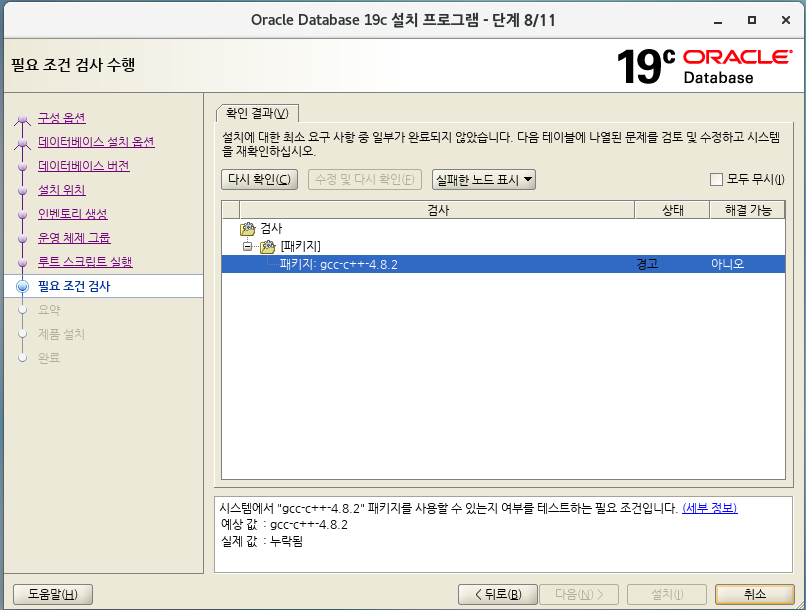
패키지 파일을 확인 후 설치
패키지 파일 설치 후 다시 확인을 눌러 필요 조건 검사를 재실행한다.
[root@test ~]# cd /run/media/root/CentOS\ 7\ x86_64/Packages/[root@test Packages]# rpm -Uvh gcc-4.8.5-44.el7.x86_64.rpm
경고: gcc-4.8.5-44.el7.x86_64.rpm: Header V3 RSA/SHA256 Signature, key ID f4a80eb5: NOKEY
준비 중... ################################# [100%]
Updating / installing...
1:gcc-4.8.5-44.el7 ################################# [100%]
[root@test Packages]# rpm -Uvh gcc-c++-4.8.5-44.el7.x86_64.rpm
경고: gcc-c++-4.8.5-44.el7.x86_64.rpm: Header V3 RSA/SHA256 Signature, key ID f4a80eb5: NOKEY
준비 중... ################################# [100%]
Updating / installing...
1:gcc-c++-4.8.5-44.el7 ################################# [100%]
설치

설치 시작
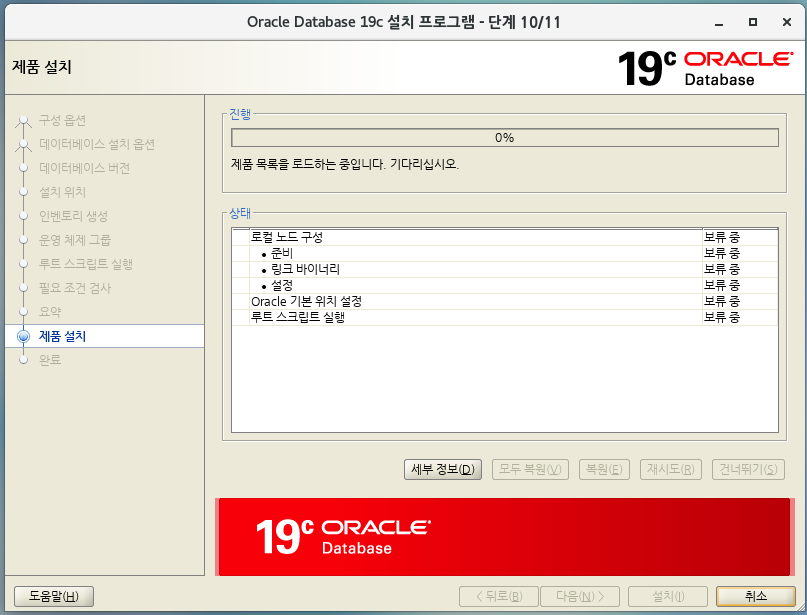
root 스크립트를 전 확인 메세지
Yes 선택

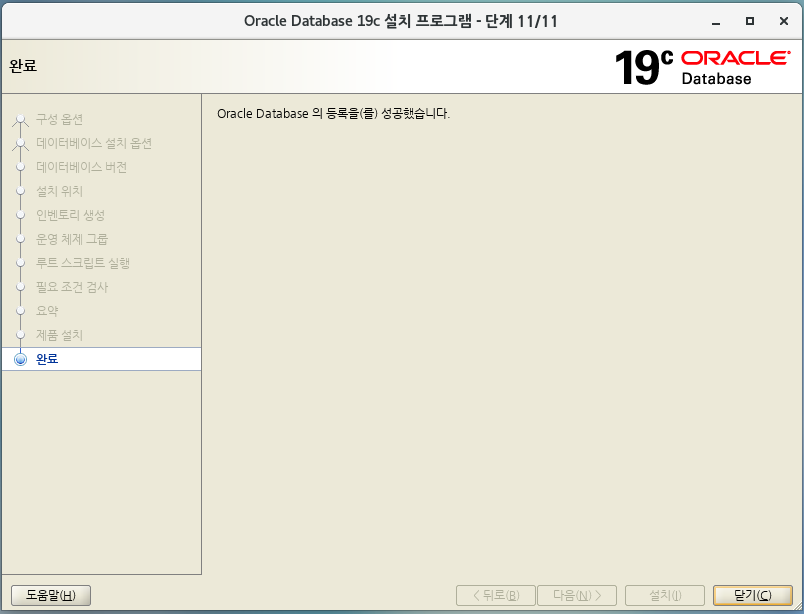
오라클 소프트웨어 설치 완료
'DB ORACLE 공부 기록' 카테고리의 다른 글
| Oracle Inventory (0) | 2022.05.02 |
|---|---|
| ORACLE Enterprise/Standard 차이 (0) | 2022.05.02 |
| DBCA를 통한 데이터베이스 생성 (0) | 2022.05.02 |
| ORACLE 설치 전 사전 작업 (0) | 2022.04.25 |
| VirtualBox(버추얼박스) 설치 (0) | 2022.04.20 |