◾ collision domain

HUB

◾ broadcast domain

* collision : 네트워크에 흘러가는 전기적인 신호
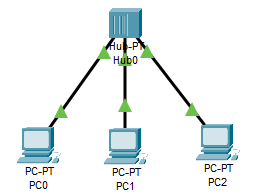
 

HUB에는 CPU, 메모리가 없다.

네트워크에 허브만 늘어나면 네트워크가 점점 느려진다.


패킷을 보내기 작업

carrier sense 확인

모든 station 에 전달 : multiple access (NAT network) > 더미 네트워크

-> 이더넷 방식

두곳에서 패킷을 보내면 collision signal이 일어남

충돌이 일어나면 잠시 멈춘다. -> collision dectection

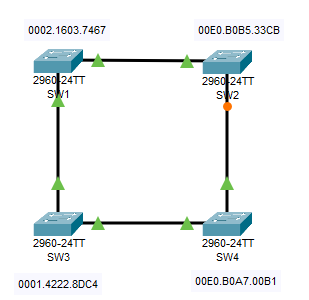
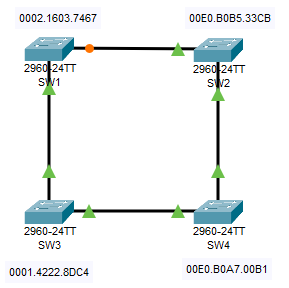
collision이 발생했을때 어디까지 도착하느냐 > collision domain (스니핑 가능)

전체 collision이 발생하는지 확인 가능


브리지 장비를 이용 (브리지에는 cpu, 메모리 있음)

learning

PC0에서 PC1으로 패킷을 보내면 switch가 learning하고, 

switch 가 

0>1, 2>3, 4>5 이렇게 패킷을 동시에 보낼 수 있다.


pc0와 pc2가 동시에 pc1에 보내면 switch가 버퍼에 저장


pc0 > pc1에 패킷을 보내면 어디까지는 collision domain
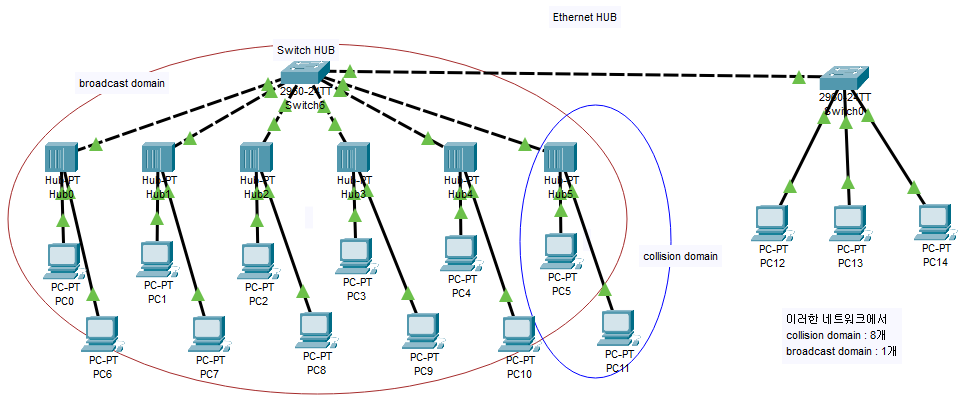
 

이러한 네트워크에서

collision domain : 8개

broadcast domain : 1개


VLAN

• VLAN(Virtual LAN)은 스위치내부를 여러 개의 독립 스위치 장비처럼 분할해주거나 이웃 스위치와 통합하는 기능을 제공한다.
• 대규모 네트워크에서 브로드캐스트 트래픽을 차단해주는 역할 제공한다.
• 각각의 VLAN 은 마치 단독의 별도 장치처럼 패킷을 송수신한다.
• VLAN은 각 스위치의 포트별로 설정하며 기본값은 모든 포트가 VLAN1에 속해 있다.
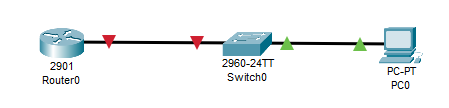
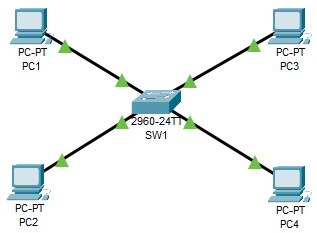
 

◾ VLAN으로 환경 구성
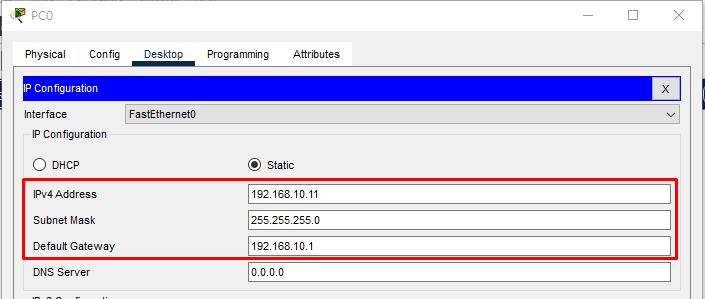
• PC1, PC2 ..는 각각 Fa0/1, Fa0/2 ..에 연결된다.

◾ VLAN 관련 명령
• show vlan : 현재 VLAN 확인
• show interface status : 각 인터페이스의 상태 확인
• vlan database : VLAN 생성
 - vlan ## name [vnan name]  ‐ VLAN 모드에서 작업
• vlan ## : VLAN 생성
 - name vlan [vnan name]  ‐ VLAN 인터페이스에서 작업
• switchport access vlan ## : 인터페이스를 VLAN에 할당
• switchport mode [access | trunk | dynamic ] : 인터페이스의 mode 정의
  (+ dynamic [auto | desirable] )


◾ 스위치의 VLAN 상태 확인

sw1#show vlan

VLAN Name                             Status    Ports
---- -------------------------------- --------- -------------------------------
1    default                          active    Fa0/1, Fa0/2, Fa0/3, Fa0/4
                                                Fa0/5, Fa0/6, Fa0/7, Fa0/8
                                                Fa0/9, Fa0/10, Fa0/11, Fa0/12
                                                Fa0/13, Fa0/14, Fa0/15, Fa0/16
                                                Fa0/17, Fa0/18, Fa0/19, Fa0/20
                                                Fa0/21, Fa0/22, Fa0/23, Fa0/24
                                                Gig0/1, Gig0/2
1002 fddi-default                     active    
1003 token-ring-default               active    
1004 fddinet-default                  active    
1005 trnet-default                    active    

VLAN Type  SAID       MTU   Parent RingNo BridgeNo Stp  BrdgMode Trans1 Trans2
---- ----- ---------- ----- ------ ------ -------- ---- -------- ------ ------
1    enet  100001     1500  -      -      -        -    -        0      0
1002 fddi  101002     1500  -      -      -        -    -        0      0   
1003 tr    101003     1500  -      -      -        -    -        0      0   
1004 fdnet 101004     1500  -      -      -        ieee -        0      0   
1005 trnet 101005     1500  -      -      -        ibm  -        0      0   
...

sw1#show interface status
Port      Name               Status       Vlan       Duplex  Speed Type
Fa0/1                        connected    1          auto    auto  10/100BaseTX
Fa0/2                        connected    1          auto    auto  10/100BaseTX
Fa0/3                        connected    1          auto    auto  10/100BaseTX
Fa0/4                        connected    1          auto    auto  10/100BaseTX
Fa0/5                        notconnect   1          auto    auto  10/100BaseTX
...


◾ VLAN 생성

글로벌 모드에서 vlan 지정

sw1(config)#vlan 2
sw1(config-vlan)#name vlan2
sw1(config)#vlan 3
sw1(config-vlan)#name vlan3
sw1(config-vlan)#exit
sw1(config)#vlan 4
sw1(config-vlan)#name vlan4
sw1(config-vlan)#exit
sw1(config)#do show vlan

VLAN Name                             Status    Ports
---- -------------------------------- --------- -------------------------------
1    default                          active    Fa0/1, Fa0/2, Fa0/3, Fa0/4
                                                Fa0/5, Fa0/6, Fa0/7, Fa0/8
                                                ...
2    vlan2                            active    
3    vlan3                            active    
4    vlan4                            active


◾ VLAN에 인터페이스를 할당한다.
• 개별 인터페이스 모드에서 작업한다.
• access 모드는 필수가 아니다.

sw1(config)#do show interface status
Port      Name               Status       Vlan       Duplex  Speed Type
Fa0/1                        connected    1          auto    auto  10/100BaseTX
Fa0/2                        connected    1          auto    auto  10/100BaseTX
Fa0/3                        connected    1          auto    auto  10/100BaseTX
Fa0/4                        connected    1          auto    auto  10/100BaseTX
...

sw1(config)#interface Fa0/2
sw1(config-if)#switchport access vlan 2
sw1(config-if)#switchport mode access
sw1(config-if)#exit
sw1(config)#interface Fa0/3
sw1(config-if)#switchport access vlan 3
sw1(config-if)#switchport mode access
sw1(config-if)#exit
sw1(config)#interface Fa0/4
sw1(config-if)#switchport access vlan 4
sw1(config-if)#switchport mode access
sw1(config-if)#do show vlan

VLAN Name                             Status    Ports
---- -------------------------------- --------- -------------------------------
1    default                          active    Fa0/1, Fa0/5, Fa0/6, Fa0/7
                                                ...
2    vlan2                            active    Fa0/2
3    vlan3                            active    Fa0/3
4    vlan4                            active    Fa0/4

sw1(config-if)#do show interface status
Port      Name               Status       Vlan       Duplex  Speed Type
Fa0/1                        connected    1          auto    auto  10/100BaseTX
Fa0/2                        connected    2          auto    auto  10/100BaseTX
Fa0/3                        connected    3          auto    auto  10/100BaseTX
Fa0/4                        connected    4          auto    auto  10/100BaseTX


'네트워크 공부 기록' 카테고리의 다른 글

Router 및 정적 라우팅  (0) 2022.01.14
VLAN 실습  (0) 2022.01.13
STP  (0) 2022.01.11
Switch  (0) 2022.01.11
IOS(Internetwork Operating System) 및 IP 설정  (0) 2022.01.05

STP

◾ BID(Bridge ID)
• 스위치 식별 정보
 - Switch ID가 아니라 BID다.
• 8byte(64bit)로 구성된다.
 - Bridge Priority(2byte) + Mac Address(6byte)
 - Bridge Priority default : 32768 (0~65535)
 - 필요하다면 수정 가능하다.
 - 4096의 배수로 설정 가능
• 작을 수록 우선 순위가 높다.


◾ BPDU(Bridge Protocol Data Unit)
• 각 스위치가 부팅 후 2초마다 BID등의 정보를 교환한다.
• Path cost, BID등의 정보를 포함한다.
• 스위치에 문제가 발생하거나 회선에 문제가 발생시에 10개 이상의 BPDU에 에러가 발생하면 새로운 경로를 설정한다.


◾ Path cost
• 데이터 전송비용
• 1000Mbps를 링크 대역폭으로 나눈 값 : IEEE 802.1D
 - Fast ethernet(100M bps) : 1000/100=10
 - Giga ethernet : 1000/1000=1
• 빠를 수록 적은 값을 가진다.
• 다양한 대역폭으로 인해 복잡한 값의 path cost가 계산됨으로 이를 단순화 함.

* Path cost


• A-B : 19
• A-C : 100
• C-D : 4
• A-D : 104
• B-C : 119
• B-D : 123


◾ STP

: looping을 제어하는 프로토콜
• 자동화된 기능이다.
• 다중 경로를 하나의 경로로 자동 구성하고 네트워크 상황에 따라 동적으로 경로를 수정한다.


◾ STP 구현
① 네트워크에 Root bridge를 선정한다. (Bid가 가장 작은 값을 루트 브리지로 설정)
  - 나머지 모든 스위치는 non root bridge가 된다.
② 모든 non root bridge는 하나의 root port를 갖는다.
③ 연결마다 하나씩 데지그레이티드 포트(Designated port) 선정한다.
④ Non designated port를 선정한다.

브릿지의 MAC주소를 A,B,C로 정의함, BID 값이 가장 작은 것으로 루트 브릿지를 설정

BID는 Bridge Priority(2byte) + Mac Address(6byte)로 설정

Bridge Priority 는 값이 모두 같아 MAC Address로 bid가 결정된다.


실습

Switch0

Switch>enable
Switch#show spanning-tree 
VLAN0001
  Spanning tree enabled protocol ieee
  Root ID    Priority    32769
             Address     0001.6378.7087
             Cost        8
             Port        26(GigabitEthernet0/2)
             Hello Time  2 sec  Max Age 20 sec  Forward Delay 15 sec

  Bridge ID  Priority    32769  (priority 32768 sys-id-ext 1)
             Address     0030.F249.9DEC
             Hello Time  2 sec  Max Age 20 sec  Forward Delay 15 sec
             Aging Time  20

Interface        Role Sts Cost      Prio.Nbr Type
---------------- ---- --- --------- -------- --------------------------------
Gi0/1            Altn BLK 4         128.25   P2p
Gi0/2            Root FWD 4         128.26   P2p

Switch2

Switch>enable
Switch#show spanning-tree 
VLAN0001
  Spanning tree enabled protocol ieee
  Root ID    Priority    32769
             Address     0001.6378.7087
             Cost        4
             Port        26(GigabitEthernet0/2)
             Hello Time  2 sec  Max Age 20 sec  Forward Delay 15 sec

  Bridge ID  Priority    32769  (priority 32768 sys-id-ext 1)
             Address     0002.17B0.38E8
             Hello Time  2 sec  Max Age 20 sec  Forward Delay 15 sec
             Aging Time  20

Interface        Role Sts Cost      Prio.Nbr Type
---------------- ---- --- --------- -------- --------------------------------
Gi0/2            Root FWD 4         128.26   P2p
Gi0/1            Desg FWD 4         128.25   P2p

32769 : vlan으로 나눠질 경우를 대비하여 


◾ SW의 BID를 낮게 수정하면 사용자가 임의로 루트 스위치를 지정할
수 있다.
• spanning‐tree vlan 1 [priority #### | root primary]
priority #### : 4096의 배수로 priority를 지정한다.
root primary : 대상 스위치를 루트 스위치로 강제한다.


- SW3을 root switch로 지정한다.

Switch3

Switch>enable
Switch#conf t
Enter configuration commands, one per line.  End with CNTL/Z.
Switch(config)#hostname sw3
sw3(config)#no ip domain-lookup 
sw3(config)#exit
sw3#
%SYS-5-CONFIG_I: Configured from console by console

sw3#copy running-config startup-config 
Destination filename [startup-config]? 
Building configuration...
[OK]
sw3#
sw3#confi t
Enter configuration commands, one per line.  End with CNTL/Z.
sw3(config)#spanning-tree
sw3(config)#spanning-tree vlan 1 priority 4096
sw3(config)#do show spanning-tree
VLAN0001
  Spanning tree enabled protocol ieee
  Root ID    Priority    4097
             Address     0001.4222.8DC4
             This bridge is the root
             Hello Time  2 sec  Max Age 20 sec  Forward Delay 15 sec

  Bridge ID  Priority    4097  (priority 4096 sys-id-ext 1)
             Address     0001.4222.8DC4
             Hello Time  2 sec  Max Age 20 sec  Forward Delay 15 sec
             Aging Time  20

Interface        Role Sts Cost      Prio.Nbr Type
---------------- ---- --- --------- -------- --------------------------------
Fa0/1            Desg FWD 19        128.1    P2p
Fa0/2            Desg FWD 19        128.2    P2p

RB : sw3

- Switch4를 root bridge로 지정

sw4(config)#spanning-tree
sw4(config)#spanning-tree vlan 1 root primary
sw4(config)#do show spanning-tree
VLAN0001
  Spanning tree enabled protocol ieee
  Root ID    Priority    1
             Address     00E0.B0A7.00B1
             This bridge is the root
             Hello Time  2 sec  Max Age 20 sec  Forward Delay 15 sec

  Bridge ID  Priority    1  (priority 0 sys-id-ext 1)
             Address     00E0.B0A7.00B1
             Hello Time  2 sec  Max Age 20 sec  Forward Delay 15 sec
             Aging Time  20

Interface        Role Sts Cost      Prio.Nbr Type
---------------- ---- --- --------- -------- --------------------------------
Fa0/2            Desg FWD 19        128.2    P2p
Fa0/1            Desg FWD 19        128.1    P2p

* do 명령은 global configuration mode에서 privileged exec mode 명령을 사용할 수 있도록 해준다.

RB : sw4

'네트워크 공부 기록' 카테고리의 다른 글

VLAN 실습  (0) 2022.01.13
VLAN  (0) 2022.01.13
Switch  (0) 2022.01.11
IOS(Internetwork Operating System) 및 IP 설정  (0) 2022.01.05
네트워크 12 - 네트워크 관련 프로토콜 (ICMP, ARP)  (0) 2021.10.18

Switch HUB

◾ Switch는 segment 연결 장치인 Bridge가 확장된 장비이다.
• Switch와 Bridge의 작동 방식, 알고리즘은 동일하다
 - Multiport bridge = switch HUB.
• 실제 사용된 bridge는 switch와 H/W 구성이 많이 다르다.
• Switch의 기본 기능

 - Learning : Bridge가 소스주소(송신주소)를 보고 Bridge table에 MAC address를 채우는 과정

 - Flooding : 브리지에서 다른 브리지로 패킷을 보내는 과정
 - Filtering : 어느 목적지로 가야할지 패킷을 필터링하는 과정
 - Forwarding : 목적지를 확인해 현재 포트에서 해당 포트로 패킷을 보내는 과정
 - Aging : 사용하지 않는 MAC address를 table에서 없애는 것

◾ Switch 설정
• STP : Spanning Tree Protocol
• VLAN


◾ Switch - show명령

• Swhitch# show [옵션] (프리빌리지 모드)
 - ip interface brief : 인터페이스별 설정 정보
 - interface [if명] : 인터페이스의 통계 정보
 - spanning‐tree : STP 관련 정보
 - cdp neighbor : 주변 장비 확인
 - cdp neighbor detail : 인접 장비 정보 확인
 - running‐config : 설정 정보 확인


◾ 스위치 상태 확인
• 관리자 모드에서 실행한다.
• show interface [status | if_명 | vlan #]
 - show interface status

Switch>
Switch>enable
Switch#show interface status
Port      Name               Status       Vlan       Duplex  Speed Type
Fa0/1                        connected    1          auto    auto  10/100BaseTX
Fa0/2                        connected    1          auto    auto  10/100BaseTX
Fa0/3                        notconnect   1          auto    auto  10/100BaseTX
Fa0/4                        notconnect   1          auto    auto  10/100BaseTX
Fa0/5                        notconnect   1          auto    auto  10/100BaseTX
...


 - show interface vlan 1

Switch#show interface vlan1
Vlan1 is up, line protocol is up
  Hardware is CPU Interface, address is 00e0.b056.6dae (bia 00e0.b056.6dae)
  Internet address is 192.168.10.201/24
  MTU 1500 bytes, BW 100000 Kbit, DLY 1000000 usec,
     reliability 255/255, txload 1/255, rxload 1/255
...


- show running-config : 현재 사용되는 config 보여줌

Switch#show running-config 
Building configuration...

Current configuration : 1135 bytes
!
version 15.0
no service timestamps log datetime msec
no service timestamps debug datetime msec
no service password-encryption
...

이렇게 네트워크가 구성되면 네트워크 전체가 죽어버릴 수 있다.

네트워크에 흐르는 패킷 양이 늘어난다.

(PC0에서 PC1로 패킷을 보내려고하면 Switch0에서 패킷을 Switch1, Switch2로 패킷을 보내 네트워크에 흐르는 패킷 양이 늘어난다.)

스위치 구성 방법

보통 위와 같은 방식으로 네트워크를 구성한다.

'네트워크 공부 기록' 카테고리의 다른 글

VLAN  (0) 2022.01.13
STP  (0) 2022.01.11
IOS(Internetwork Operating System) 및 IP 설정  (0) 2022.01.05
네트워크 12 - 네트워크 관련 프로토콜 (ICMP, ARP)  (0) 2021.10.18
네트워크 11 - NAT  (0) 2021.10.18

IOS(Internetwork Operating System)

: IOS는 시스코 시스템의 운영체제이면서 시스템 소프트웨어

- CLI(Command Line Interface)와 GUI가 모두 지원
- GUI의 설정은 CLI에 비해서 쉬우나 모든 기능을 지원하지 않음으로 반드시 CLI 작업에 익숙해야 한다.
- PT의 경우 CLI 설정은 장비와 동일하지만 GUI는 PT만의 별도 인터페이스임으로 실습은 CLI를 이용한다.


IOS - Mode

▶ 접속 모드
• 사용자 모드 : User EXEC Mode
 - 장치 설정 불가
 - show 등의 명령어
 - Router>, Switch>


• 관리자 모드 : Privileged EXEC Mode
 - 설정이나 동작 확인 (네트워크 상태 확인시)
 - 제한적인 설정 명령
 - 네트워크 확인 : ping, telnet, traceroute
 - 설정 저장이나 재시작 : write memory, reload
 - Router#, Switch#


• 전역 설정 모드 : Global Configuration Mode
 - 장치 설정 모드
 - EXEC 모드의 모든 명령어 사용 가능
 - Switch나 Router의 설정 모드
 - Router(config)#, Switch(config)#

Switch>                    → User Mode
Switch>enable  
Switch#                    → Privileged Mode
Switch#configure terminal
Enter configuration commands, one per line.  End with CNTL/Z.
Switch(config)#            → Global Configuration Mode


▶ help command
• ? : 각 모드에서 사용가능한 명령어
• 명령어 + ?
ex) conf? 또는 configure ?
- conf로 시작하는 명령어나 configure 이후 옵션에 대한 도움말 기능
• 명령 완성 기능
- [TAB] 키를 이용해서 리눅스 터미널과 같은 명령 완성 기능을 제공


▶ 장치 이름 설정
• hostname [장치명]

라우터 설정

Router>
Router>ena
Router>enable 
Router#conf t
Enter configuration commands, one per line.  End with CNTL/Z.
Router(config)#hostname gw001
gw001(config)#

switch 설정

Switch>enable
Switch#conf
Switch#configure ter
Switch#configure terminal 
Enter configuration commands, one per line.  End with CNTL/Z.
Switch(config)#hostname sw001
sw001(config)#


▶ 관리자 모드 진입 비밀번호
• enable password
- 평문으로 저장된다.
- 형식 : enable password [패스워드]

gw001(config)#enable password pass
gw001(config)#exit
gw001#
%SYS-5-CONFIG_I: Configured from console by console

gw001#disable
gw001>enable
Password: ← 암호입력
gw001#


• enable secret
- enable password보다 우선하며 해시코드로 저장된다.
- 형식 : enable secret [패스워드]

Router(config)# enable secret secr
.......
Router> enable
Password:  ← 암호입력
Router#


▶ show 명령
• 장비의 다양한 정보를 확인하는데 사용한다.
• show [옵션]
   - running‐config : RAM의 현재 설정 정보 확인
   - startup‐config : NVRAM(하드드라이브)에 저장된 설정 내용 확인
   - version : IOS 버전 정보
   - flash : Flash 정보
   - ip interface brief : 인터페이스별 설정 정보
   - interface [if명] : 인터페이스의 통계 정보
   - cdp neighbor : 주변 장비 확인
   - cdp neighbor detail : 인접 장비 정보 확인


show running‐config 명령을 이용한 설정 확인

Router# show ru
Building configuration...
.......
.......
enable secret 5 $1$mERr$Xk4cDQq6dF18bdESpMtqO.
enable password password
.......
.......
line con 0
password password
login


▶ 비밀번호 해제
• 설정 명령어 앞에 no를 추가하면 설정이 해제된다.
• 해제명령은 설정 명령과 동일한 모드에서 실행한다.
• disable password
  - no enable password

gw001(config)#no enable password
gw001(config)#

• disable secret
  - no enable secret


*장비에 설정된 내용은 RAM(running config)에 저장되고 이 내용은 리부팅하면 사라진다. 

설정된 내용을 영구적으로 저장하기 위해서는 NVRAM(startup config)에 저장해야 한다.


▶ NVRAM에 설정 저장 명령
• copy running‐config startup‐config


▶ NVRAM의 설정 삭제 명령
• erase startup‐config


▶ 장비 재부팅
• reload


IOS - 설정 내역 저장 확인

Router# show running‐config
.......
Router# show startup‐config
startup‐config is not present   ← NVRAM에 startup 설정이 저장되지 않았다.
Router# copy running‐config startup‐config
Destination filename [startup‐config]?
Building configuration...
[OK]
Router# show startup‐config
.......        
                                ← NVRAM에 저장된 startup 설정이 출력된다.


IOS - 메모리

▶ DRAM
• RAM으로 현재 설정정보가 저장된다.
• CPU가 IOS를 실행하고 running config, routing table등이 저장된다.


▶ NVRAM (하드드라이브)
• startup configuration file이 저장된다.
• 장치가 부팅할 때 파일이 저장된다.


▶ EPROM
• ROM으로 PC의 BIOS와 기능이 동일하다.
• Flash memor에 IOS image 파일이 작동하지 않을때 필요한 S/W가 저장된다.


▶ Flasch memory
• IOS image 파일이 저장된다.(운영체제 저장)
• PC의 SSD와 동일한 기능을 제공한다.


ISO - 추가 명령어

▶ DNS lookup 기능 해제 (이상한 명령을 치면 오래걸리는 것을 방지)
• no ip domain‐lookup

Router(config)# no ip domain‐lookup
Router(config)# exit
Router# abc
Translating "abc"
% Unknown command or computer name, or unable to find computer address

gw001#copy running-config startup-config 
Destination filename [startup-config]? 
Building configuration...
[OK]
gw001#show startup-config 
...
no ip domain-lookup


이것을 NVRAM에 저장해줘야 한다. (copy running-config startup-config)


IP 설정

라우터에 시리얼 포트 추가한다.

config에 보면 serial 포트가 두개 추가 된 것을 확인


▶ IP 할당
• 라우터는 인터페이스(네트워크 인터페이스 : LAN카드)별로 IP를 갖는다.
• 스위치는 장치에 IP가 할당된다.
 - VLAN 별로 IP가 할당된다.

 - 원래는 ip를 세팅할 필요가 없다. 스위치허브는 2 Layer 장치

 - 장치에 접근해서 config해야하므로 손쉽게 하기 위해 ip 세팅 

*스위치는 컴퓨터X


이더넷 : 네트워크의 한 방식 (통신규격) > Link Layer

리눅스 ip 2개 세팅? > 물리적인 랜카드가 하나지만 가상 인터페이스를 추가해서 ens32:0, ens32:1 생성 (MAC address가 같음)


▶ IP 설정 - PC

Desktop - IP configuration


▶ IP 설정 - Router, Switch

▷ 인터페이스 모드
• interface [if명 | range if범위]
- switch는 vlan에 IP를 할당한다.
ex) (config)# interface gigabitEthernet0/0
       (config)# interface range fa0/1‐10, fa0/21  ← 범위 설정


▷ 인터페이스 활성화/비활성화
• no shutdown/shutdown
ex) (config‐if)# no shutdown
       (config‐if)# shutdown


▷ IP 할당
• ip address [ip] [netmask]
ex) (config‐if)# ip address 192.168.10.1 255.255.255.0


라우터 ip 할당 (네트워크 인터페이스에 할당)

Router>
Router>enable
Router#configure t
Enter configuration commands, one per line.  End with CNTL/Z.
Router(config)#no ip domain-lookup 
Router(config)#exit
Router#
%SYS-5-CONFIG_I: Configured from console by console

Router#copy 
Router#copy ?
  flash:          Copy from flash: file system
  ftp:            Copy from ftp: file system
  running-config  Copy from current system configuration
  scp:            Copy from scp: file system
  startup-config  Copy from startup configuration
  tftp:           Copy from tftp: file system
Router#copy running-config startup-config 
Destination filename [startup-config]? 
Building configuration...
[OK]
Router#
% Unknown command or computer name, or unable to find computer address

Router#conf t
Enter configuration commands, one per line.  End with CNTL/Z.
Router(config)#interface gigabitEthernet0/0
Router(config-if)#ip address 192.168.10.1 255.255.255.0
Router(config-if)#no shutdown 

Router(config-if)#
%LINK-5-CHANGED: Interface GigabitEthernet0/0, changed state to up

%LINEPROTO-5-UPDOWN: Line protocol on Interface GigabitEthernet0/0, changed state to up
	
Router(config-if)#exit
Router(config)#exit
Router#
%SYS-5-CONFIG_I: Configured from console by console

Router#copy running-config startup-config 
Destination filename [startup-config]? 
Building configuration...
[OK]
Router#


스위치 ip 할당 (vlan 장치에 할당)

Switch>
Switch>enable
Switch#configure t
Enter configuration commands, one per line.  End with CNTL/Z.
Switch(config)#no ip domain-lookup 
Switch(config)#exit
Switch#
%SYS-5-CONFIG_I: Configured from console by console

Switch#copy running-config startup-config 
Destination filename [startup-config]? 
Building configuration...
[OK]
Switch#conf t
Enter configuration commands, one per line.  End with CNTL/Z.
Switch(config)#interface vlan1
Switch(config-if)#ip addre
Switch(config-if)#ip address 192.168.10.201
Switch(config-if)#ip address 192.168.10.201 255.255.255.0
Switch(config-if)#no shutdown 

Switch(config-if)#
%LINK-5-CHANGED: Interface Vlan1, changed state to up

%LINEPROTO-5-UPDOWN: Line protocol on Interface Vlan1, changed state to up

Switch(config-if)#exit
Switch(config)#exit
Switch#
%SYS-5-CONFIG_I: Configured from console by console

Switch#copy running-config startup-config 
Destination filename [startup-config]? 
Building configuration...
[OK]
Switch#


▷ Telnet 접속

라우터나 스위치에 설정된 IP를 이용하면 콘솔이외에 telnet과 같은 네트워크 접속이 가능하다.
• 외부 네트워크 접속을 위해서는 반드시 관리자 모드에 대한 패스워드가 설정되어 있어야 한다.
• 명령
   line vty 0 4
   login
   password [패스워드]
• 설정 이후 설정 내용은 반드시 저장한 다음 접속을 테스트 한다.


- 라우터 telnet 접속 설정

Router(config)#line vty 0 4
Router(config-line)#login
% Login disabled on line 388, until 'password' is set
% Login disabled on line 389, until 'password' is set
% Login disabled on line 390, until 'password' is set
% Login disabled on line 391, until 'password' is set
% Login disabled on line 392, until 'password' is set
Router(config-line)#password routerpw


- 스위치 telnet 접속 설정

Switch(config)#line vty 0 4
Switch(config-line)#login
% Login disabled on line 1, until 'password' is set
% Login disabled on line 2, until 'password' is set
% Login disabled on line 3, until 'password' is set
% Login disabled on line 4, until 'password' is set
% Login disabled on line 5, until 'password' is set
Switch(config-line)#password switchpw


- telnet 접속 test

router

C:\>telnet 192.168.10.1
Trying 192.168.10.1 ...Open


User Access Verification

Password: 
Router>enable
% No password set.
Router>
Router>exit


switch hub


C:\>telnet 192.168.10.201
Trying 192.168.10.201 ...Open


User Access Verification

Password: 
Switch>enable
% No password set.
Switch>

'네트워크 공부 기록' 카테고리의 다른 글

STP  (0) 2022.01.11
Switch  (0) 2022.01.11
네트워크 12 - 네트워크 관련 프로토콜 (ICMP, ARP)  (0) 2021.10.18
네트워크 11 - NAT  (0) 2021.10.18
네트워크 10 - 네트워크 분할(서브네팅) 및 VLSM  (1) 2021.10.15

우리 부서에서 필요한 물품을 총무과에 의뢰한다.

문서 번호는 회사에서 공식적으로 번호를 매긴다.

여기서 품명은 자재이다. (제품 : 판매하는 품목 / 자재 : 구매하는 품목)


구매의뢰와 자재발주는 관계가 있는 경우가 많아 관계 표시를 해준다.

구매의뢰서와 발주 관계는 다대다 관계이다.

하나의 구매의뢰를 여러발주 / 여러 구매를 하나의 발주 한다고 생각한다.

'모델링 공부 기록' 카테고리의 다른 글

모델링 3 - 논리적 모델링  (0) 2022.01.18
모델링 Total  (0) 2022.01.14
거래처관리 & 차량운행일지 모델링  (0) 2021.12.29
판매 전표 모델링  (0) 2021.12.29
인사기록 모델링  (0) 2021.12.29


'모델링 공부 기록' 카테고리의 다른 글

모델링 Total  (0) 2022.01.14
구매의뢰서 & 자재발주서 모델링  (0) 2021.12.29
판매 전표 모델링  (0) 2021.12.29
인사기록 모델링  (0) 2021.12.29
영수증 모델링  (0) 2021.12.24


• 1차 정규화

: 반복그룹 속성을 추출한다. (도메인이 원자값)
 - 자식 개체가 추출되고 반드시 식별관계이다.
 - 주식별자를 가지고 나간다.
 - 자식 개체 주 식별자에 반드시 속성이 추가된다.


• 2차 정규화

: 주 식별자에 완전 기능 종속되지 않는 속성을 추출한다.
 - 자식 개체 주 식별자에 외부 식별자를 두고 나간다.
 - 부모개체가 추출되고 반드시 식별관계이다.


• 3차 정규화

: 주 식별자에 이행 종속인 속성을 추출한다.
 - 일반 속성에 외부 식별자를 두고 나간다.
 - 부모개체가 추출되고 반드시 비 식별 관계이다. (비식별관계에서는 O가 거의 반드시 있음)


'모델링 공부 기록' 카테고리의 다른 글

구매의뢰서 & 자재발주서 모델링  (0) 2021.12.29
거래처관리 & 차량운행일지 모델링  (0) 2021.12.29
인사기록 모델링  (0) 2021.12.29
영수증 모델링  (0) 2021.12.24
ERwin 기본 설정  (0) 2021.12.19


1차 정규화

반복그룹 속성을 추출한다. (도메인이 원자값) : 보증인, 면허자격, 가족, 학력, 경력, 교육훈련, 상벌 반복 속성이 추출
 - 자식 개체가 추출되고 반드시 식별관계이다. 
 - 주식별자를 가지고 나간다. : 인사기록카드번호 가지고 나감
 - 자식 개체 주 식별자에 반드시 속성이 추가된다. : 순번 추가


아래와 같이 구분을 두어 부가정보를 합쳐 모델링이 가능하다.

'모델링 공부 기록' 카테고리의 다른 글

거래처관리 & 차량운행일지 모델링  (0) 2021.12.29
판매 전표 모델링  (0) 2021.12.29
영수증 모델링  (0) 2021.12.24
ERwin 기본 설정  (0) 2021.12.19
모델링 2 - 정규화 (1차, 2차, 3차 정규화)  (0) 2021.12.19


• 1차 정규화

: 반복그룹 속성을 추출한다. (도메인이 원자값)
 - 자식 개체가 추출되고 반드시 식별관계이다.
 - 주식별자를 가지고 나간다.
 - 자식 개체 주 식별자에 반드시 속성이 추가된다.


번호, 품명, 수량, 단가, 금액이 중복속성이므로 따로 추출한다.

주식별자를 정하는데 주식별자에 번호를 올리고 번호를 자재번호로 변경한다.

1차 정규화를 하면 아래와 같다.


• 2차 정규화

: 주 식별자에 완전 기능 종속되지 않는 속성을 추출한다.
 - 자식 개체 주 식별자에 외부 식별자를 두고 나간다.
 - 부모개체가 추출되고 반드시 식별관계이다.


자재번호에 품명과 표준단가가 정해지므로 부분함수 종속이다.

따라서 자재 테이블을 따로 추출한다.


• 3차 정규화

: 주 식별자에 이행 종속인 속성을 추출한다.
 - 일반 속성에 외부 식별자를 두고 나간다.
 - 부모개체가 추출되고 반드시 비 식별 관계이다.


영수증번호가 사업자등록번호를 정하고 사업자등록번호는 사업자 상호, 성명 등을 결정한다.

이행적 함수 종속이므로 따로 추출한다.


'모델링 공부 기록' 카테고리의 다른 글

판매 전표 모델링  (0) 2021.12.29
인사기록 모델링  (0) 2021.12.29
ERwin 기본 설정  (0) 2021.12.19
모델링 2 - 정규화 (1차, 2차, 3차 정규화)  (0) 2021.12.19
모델링 1 - 데이터베이스 모델링  (0) 2021.12.19

세션

값을 전달하지 않고 값을 계속 유지시켜주는 방식

*세션에 많은 정보를 저장하면 안된다.


세션 VS 쿠키

세션에 저장되는 정보는 서버쪽에 저장

쿠키는 브라우저에 저장 (해킹 쉬움)


a.php

<?
  session_start();

  $_SESSION["name"] = '학생';
  $_SESSION["passwd"] = '암호';

  $name=$_SESSION["name"];
  $passwd= $_SESSION["passwd"];

  echo(" name = $name <br>");
  echo(" passwd = $passwd <br>");

  echo("<a href='./b.php'>b.php</a>");
?>


b.php

<?
  session_start();

  $_SESSION["name"] = '학생';
  $_SESSION["passwd"] = '암호';

  $name=$_SESSION["name"];
  $passwd= $_SESSION["passwd"];

  echo(" name = $name <br>");
  echo(" passwd = $passwd <br>");

  echo("<a href='./b.php'>b.php</a>");
?>

a.php
b.php

php.ini에 'session.auto_start = 1'로 설정하면 session_start() 함수를 생략 할 수 있다.

$_SESSION["name"] 변수와 $_SESSION["passwd"] 변수에 세션 값을 저장한다. 

이들 변수는 session_destroy() 함수나 session_unset() 함수가 호출되기 전까지 계속 유지된다.


▶ 세션 관련 함수

• bool session_start ( void )

  - 세션을 시작한다.
  - 매개 변수 없이 쓰인다.
  - session.auto_start=1로 설정하면 함수를 자동으로 실행한 것과 동일하다.
  - $_SESSION 배열을 이용해서 세션 변수를 등록한다.


• bool session_destroy( void )
  - 세션을 종료한다.
  - 매개 변수 없이 쓰인다.
  - 이후 세션을 이용하려면 새로운 세션을 시작해야 한다.


• void session_unset ( void )
  - 세션 변수를 모두 초기화 한다.
  - 매개 변수와 반환 값이 모두 없다.
  - 세션자체를 없애는 것은 아니다.


• string session_id ( void )
  - 세션 ID를 반환한다.


세션을 이용한 인증 처리

실선 : 마우스 클릭 / 점선 : 자동으로

• 테이블 입출력 프로그램
  - st_vi.php : student 테이블 출력 프로그램
  - st_in.html : student 테이블 입력 폼
  - st_in.php : student 테이블 입력 프로그램
• 인증 정보(계정) 등록 프로그램
  - id.html : 계정 등록 폼
  - id.php : 계정 등록 프로그램
• 로긴 프로그램
  - check.html : 로긴 정보 입력 폼
  - check.php : 로긴 프로그램


세션을 이용한 인증 처리 실습

인증을 위해 미리 테이블을 생성한다.

오라클에 접속해서 생성한다.

SQL> CREATE TABLE id(
  2  id varchar2(10),
  3  passwd varchar2(32) CONSTRAINT id_nu_passwd NOT NULL,
  4  CONSTRAINT user_pk_id PRIMARY KEY (id)
  5  );

테이블이 생성되었습니다.


• 계정 등록 프로그램


id.html

<html><head>
<meta http-equiv="content-type" content="text/html; charset=euc-kr">
<title> 계정등록 </title>
</head>
<body bgcolor="white" text="black" link="blue" vlink="purple" alink="red">
<form name="id" action="id.php" method="POST">
<center>
<table border="0" width="250">
  <tr>
    <td width="50"><p align="center">ID</p></td>
    <td>&nbsp;&nbsp;<input type="text" name="id"></td>
  </tr>
  <tr>
    <td width="50"><p align="center">passwd</p></td>
    <td>&nbsp;&nbsp;<input type="password" name="passwd"></td>
  </tr>
  <tr>
    <td colspan="2">
      <p align="center"><input type="submit" name="확인" value="확인"></p>
    </td>
  </tr>
<table>
</form>
</body></html>


id.php

<?
  require('conn.php');

  $id = $_POST["id"];
  $passwd = $_POST["passwd"];

  $sql="insert into id (id, passwd)
        values ('$id', DBMS_CRYPTO.Hash(to_clob(to_char('$passwd')),2))";

  $result=oci_parse($conn,$sql);
  $re=@oci_execute($result); // 입력된 값을 테이블에 저장한다.

  oci_free_statement($result);
  oci_close($conn);

  if(!$re){
    echo(" <script>
            window.alert('계정 등록 장애입니다.');
            history.go(-1);
            </script>
          ");
      exit;
    } // st_vi.php를 호출할 때 $id나 $passwd는 세션변수에 등록되었음으로
  else // 전달할 필요가 없다.
      echo(" <meta http-equiv='Refresh' content = '0; URL=st_vi.php'>");
?>


• 로긴 프로그램
로긴 프로그램은 st_vi.php로부터 호출된다. st_vi.php의 [login] 버튼을 클릭하면 check.html을 호출하여 id와 패스워드를 입력 받는다. 

입력된 id와 패스워드는 POST방식으로 check.php에 전달된다.


check.html

<html><head>
<meta http-equiv="content-type" content="text/html; charset=euc-kr">
<title> login </title>
</head>
<body bgcolor="white" text="black" link="blue" vlink="purple" alink="red">
<form name="login" action="check.php" method="POST">
<center>
<table border="0" width="250">
  <tr>
    <td width="50"><p align="center">ID</p></td>
    <td>&nbsp;&nbsp;<input type="text" name="id"></td>
  </tr>
  <tr>
    <td width="50"><p align="center">passwd</p></td>
    <td>&nbsp;&nbsp;<input type="password" name="passwd"></td>
  </tr>
  <tr>
    <td colspan="2">
      <p align="center"><input type="submit" name="확인" value="확인"></p>
    </td>
  </tr>
<table>
</form>
</body></html>


check.php

<?
  session_start();
  require('conn.php');

  $id = $_POST["id"];
  $passwd = $_POST["passwd"];

  $sql="select * from id
        where id = '$id'
        and passwd = DBMS_CRYPTO.Hash(to_clob(to_char('$passwd')),2)";

  $result=oci_parse($conn,$sql);
  $re=oci_execute($result);
  $row_num=oci_fetch_all($result,$row);
  oci_free_statement($result);
  oci_close($conn);

  if($row_num == 1){
    $_SESSION["id"] = $id;
    $_SESSION["passwd"] = $passwd;
    echo(" <meta http-equiv='Refresh' content = '0; URL=st_vi.php'>");
  }
  else{
    echo(" <script>
            window.alert('잘못된 계정 정보입니다.');
            history.go(-1);
            </script>
        ");
    exit;
  }
?>


• 로그인이 안된 상태에서 접근 불가능

log.php

<?
session_start();

   if(empty($_GET["logout"]))
   {}
   else session_unset();

   $id = $_SESSION["id"];
   $passwd = $_SESSION["passwd"];

   require('conn.php');

   $sql="select * from id
      where id= '$id'
      and passwd = DBMS_CRYPTO.Hash(to_clob(to_char('$passwd')),2)";

   $result=oci_parse($conn,$sql);
   $re=oci_execute($result);
   $row_num=oci_fetch_all($result,$row);

   if($row_num == 1)
   {
   }
   else
   {
      echo(" <script>
         window.alert('로그인이 필요합니다');
         history.go(-1);
         </script>
         ");
      }
?>


st_in.html

<?
  require('log.php')  // login이 안되어 있으면 접근 불가능한 것을 추가
?>

<html><head>
<meta http-equiv="content-type" content="text/html; charset=euc-kr">
<title> student 입력폼 </title>
</head>
<body bgcolor="white" text="black" link="blue" vlink="purple" alink="red">
<form name="insert" action="st_in.php" method="POST">
<center>
<table border="0" width="250">
  <tr>
    <td width="50"><p align="center">학번</p></td>
    <td>&nbsp;&nbsp;<input type="text" name="sno"></td>
  </tr>
  <tr>
    <td width="50"><p align="center">이름</p></td>
    <td>&nbsp;&nbsp;<input type="text" name="sname"></td>
  </tr>
  <tr>
    <td width="50"><p align="center">성별</p></td>
    <td>&nbsp;&nbsp;남<input type="radio" name="sex" value="남">,
                    여<input type="radio" name="sex" value="여"></td>
  </tr>
  <tr>
    <td width="50"><p align="center">학과</p></td>
    <td>&nbsp;&nbsp;<select name="major" size="1">
                      <option value="화학">화학</option>
                      <option value="생물">생물</option>
                      <option value="물리">물리</option>
                      <option value="유공">유공</option>
                      <option value="식영">식영</option></td>
  </tr>
  <tr>
    <td width="50"><p align="center">학년</p></td>
    <td>&nbsp;&nbsp;1<input type="radio" name="syear" value="1">,
                    2<input type="radio" name="syear" value="2">,
                    3<input type="radio" name="syear" value="3">,
                    4<input type="radio" name="syear" value="4"></td>
  </tr>
  <tr>
    <td width="50"><p align="center">학점</p></td>
    <td>&nbsp;&nbsp;<input type="text" name="avr"></td>
    </tr>
  <tr>
    <td colspan="2">
      <p align="center"><input type="submit" name="확인" value="확인"></p>
    </td>
  </tr>
</table>
</form>
</body></html>


로그인이 안된 상태에서 자료 입력하기를 바로 들어가려면 접근이 불가능하다.


• 테이블 입출력 프로그램
st_vi.php를 제외한 st_in.html과 st_in.php는 이전 소스와 동일해서 생략한다. st_vi.php는 로그인 상태와 로그인되지 않은 상태에 따라 출력 내용이 달라진다.

로그인 상태인 경우 데이터를 입력 버튼을 보여주지만 로그인이 아닌 상태에서는 로그인과 등록 메시지만 보여준다.


st_vi.php

<?
  //==========================로그인========================================
  session_start();

  if(empty($_GET["logout"])){}
  else session_unset(); // session_distroy 사용과 비교한다.

  $id = $_SESSION["id"];
  $passwd = $_SESSION["passwd"];

  require('conn.php');

  $sql="select * from id
        where id = '$id'
        and passwd = DBMS_CRYPTO.Hash(to_clob(to_char('$passwd')),2)";

  $result=oci_parse($conn,$sql);

  $re=oci_execute($result);
  $row_num=oci_fetch_all($result,$row);

  if($row_num == 1){ // 로긴 상태
      echo("<a href=./st_in.html>자료 입력하기</a>
            <a href=./st_vi.php?logout=$row_num>logout</a><hr>
      ");
  }
  else{ // 비로긴 상태
      echo(" <a href=./id.html>계정등록</a>
            <a href=./check.html>login</a><hr>");
  }

  //==========================자료입력========================================
  //echo("<a href=./st_in.html>자료 입력하기</a><hr>");

  //require('conn.php');

  //==========================삭제기능========================================
  $del=$_GET[del];        // $del 변수가 null이 아니면 행을 삭제하는 else절이 실행된다.
  if (empty($del)){}
  else {
	  $sql="delete from student where sno='$del'";
	  $result=oci_parse($conn,$sql);
	  oci_execute($result);
	  oci_free_statement($result);
	  }

  //==========================검색기능=========================================

    $search = $_GET[search];
	if (empty($search)) {
	 	$sql="select sno,sname,sex,major,syear,to_char(avr,'0.00') avr
	 	     from student order by sno";
	 	$result=oci_parse($conn,$sql);
	 }
	else {
	 	$sql="select sno,sname,sex,major,syear,to_char(avr,'0.00') avr
	 	       from student
	 	       where sname like '%{$search}%' order by sno";
	 	$result=oci_parse($conn,$sql);
	 }
	 oci_execute($result);

  //==========================================================================


  $row_num=oci_fetch_all($result, $row);  // $row_num : 전제 행의 수
  //echo("Row의 개수는 $row_num 입니다.<br><hr>"); // 행은 컬럼명, 열은 행번호

  oci_free_statement($result);
  oci_close($conn);

   $scale=5;                           // 화면에 출력할 행의 개수
   $start = $_GET[start];
   if (empty($start)){$start=0;}    // 첫 화면은 0에서 시작, 배열의 키값은 0에서 시작

  echo("<table border='1'>");
  for($i=$start; $i<($start+$scale); $i++) {
   if ($i<$row_num){
     echo("
    	<tr>
    		<td width='50'><p align='center'>{$row['SNO'][$i]}</p></td>
    		<td width='80'><p align='center'>{$row['SNAME'][$i]}</p></td>
    		<td width='20'><p align='center'>{$row['SEX'][$i]}</p></td>
    		<td width='20'><p align='center'>{$row['SYEAR'][$i]}</p></td>
    		<td width='50'><p align='center'>{$row['MAJOR'][$i]}</p></td>
    		<td width='30'><p align='center'>{$row['AVR'][$i]}</p></td>
    		<td width='30'><a href=./st_vi.php?del={$row[SNO][$i]}>del</a></td>
    	</tr>
    	");
  	}
	}
  echo("</table><br>");


  $p=$start-$scale;     // 이전 화면의 시작 위치
  $n=$start+$scale;     // 다음 화면의 시작 위치

  if($p>=0)
    echo("<a href=./st_vi.php?start=$p&search=$search>[이전페이지]</a>&nbsp;&nbsp;");
  else
    echo("이전페이지&nbsp;&nbsp;");
  if($n<$row_num)
    echo("<a href=./st_vi.php?start=$n&search=$search>[다음페이지]</a>");
  else
    echo("다음페이지");

  //echo("<br>");
  //echo($search); // 확인하기 위해 search 변수 출력
  echo("<hr>");
  echo("$row_num 열이 검색됨<br><br>");
?>

<form name='search' method='get' action='st_vi.php'>
 검색창 &nbsp;<input type='text' name='search'>
		   <input type='submit' name='확인' value='확인'>
 </form>

실행결과

login 전

계정을 등록한다.


계정등록

계정을 등록하고 로그인을 클릭한다.


login

로그인이 된다.


login 후

로그인하면 자료 입력하기를 할 수 있다.

+ Recent posts